30th March 2014
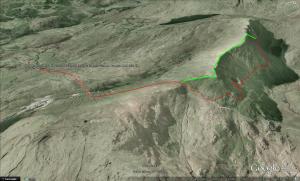
The clocks went forwards overnight on Saturday, which cost us an hour on our big day out. Nevertheless, Beth and I drove to the Walna Scar Road and started the trek in to Dow Crag.The guidebook said it would take about an hour to walk in, it took us over two hours because we went a bit wrong at the end. As you can see in the picture, the way we went (Red) first of all took us to the wrong crag (!) and then over a 30 minute scree slope traverse. The green line shows the way we should have gone, which would have saved us about 45 minutes of messing around.
To our despair, on arrival at the crag there were a couple of parties in a queue. Thankfully though they were queueing for Giant’s Crawl, a classic D line up B Buttress. We scrambled to the belay for pitch one and got set up.
Pitch 1 – 4b – 13m – Jim
A rising line out right into an exposed position over the gully, good protection with one or two bold steps that lead to good holds, the belay is quite far left on the ledge, although I belayed up more toward the right underneath a flake.
Pitch 2 – 4b – 23m – Beth
The guidebook describes a line to the left that starts with a mantleshelf into a few moves through grooves to reach a ledge 6m up to the right. There is an obvious flake line to the right that Beth started up but downclimbed and went for the route described by our book. After reaching the ledge 6m up you bridge up a groove and make a tricky move out left to gain a slab at the ‘Raven’s Nest’ recess. Beth pitched up here although newer guidebooks suggest continuing to the ledge above via either a tricky traverse right, or a technical groove straight up.
Pitch 2.5 – 4b – 5m – Jim
This ‘pitch’ is really just to get established on the big sloping ledge under the roof. I decided to traverse right rather than climb straight up above Beth’s head. Building a belay took me a while because we had been lazy with transferring gear for such a short pitch. I had the next lead so Beth followed me up and we ran the ropes through.
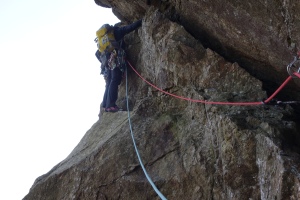
Pitch 3 – The Rocher Perchés Pitch – 4c – Jim
From the sloping ledge a bold step on the wall to the left gains a big flat jug and a tricky move left to a thread, a clever upside nut placement in the thread was good enough protection to get around the corner and into the big cave where I set up a belay on a big spike. My guidebook mentioned a peg on this pitch that was nowhere to be seen, although I think my guide is from the 70’s.
Pitch 4 – 4a – Beth
The traverse continues with this pitch to the left, although technically only 4a the pitch has poor protection (unless you have brought a C6), the pitch culminates in a bridge out left over 150ft of exposure and a grovel to a ledge and a perched block to belay from.
Pitch 5 – 4c – Jim
Apparently this pitch is the technical crux, I think it has the most technically interesting moves. You step down to the right and traverse right beneath a small overhang. This traverse has massive exposure, is well protected and involves a bit of smearing and thought. Then you romp up to the ledge on good holds. I’m still not 100% but I’m fairly sure I built my belay 5m too early. Beth followed up and we pulled the ropes through (they were getting a bit tangled here and it was getting darker and colder).
While belaying Beth up I felt really great on the ledge. It was quiet apart from the wind and the sound of gear clinking, looking down at Beth climbing above 150ft of air. Hanging off that ledge felt really peaceful, until the ropes got tangled, that was shit.
Pitch 6 – ??? – Jim
I went completely off route here, probably owing to stopping the last pitch early, the guidebook described a “slightly leftward” direction, whereas I traversed horizontally left for about 15m to a big ledge and pitched up. The rope drag was horrific and the wind was up so communication was difficult, by the time we were both on the ledge we both were thinking “I hope we’re near the top!”
Pitch 7 – 16m – Scramble – Beth
Beth scrambled leftward around the arete and up a grassy gully to a spike belay. I followed and continued.
Pitch 8 – 30m – Scramble – Jim
I managed to scramble about 30m worth before getting too far out of earshot, so I stuck a nut in and brought Beth up.
Pitch 9 – 13m – Scramble – Beth
Beth scrambled up through a couple more easy steps to a big ledge and brought me in, from here we were pretty much back on track, I continued ahead and saw we were at the top, we took coils and walked off. Six hours in total.
In Summary
All in all the route was excellent, the exposure was high and it was a grand day out. We just need to speed things up. I reckon a fast team could get up this in 2 hours safely. A few areas of improvement I can think of are:
- Plan the approach as meticulously as the climbing, take a map and factor in the slow progress on the windy roads. With the clock change and getting lost we probably started 3 hours later than we should have.
- Building belays – get snappy with identifying your anchor points, and know how to quickly equalise them with a big sling. It probably takes us 10 minutes to build a belay if it’s not obvious, this should be more like 2 minutes. If block leading, build belays that you can easily clip in and out of
- Follow the guidebook – we lost time on pitch two by trying to climb the obvious flake rather than the grooves described by the book. So follow the route description to save down climbing
- Move quickly and confidently – we probably lost most time due to this. Climbing 15m of VS shouldn’t really take 30 minutes! Although we did well as this is our first VS multipitch and our first serious route of the year.
Tips from our experience
I’m sure some will read this because they’re googling ‘Dow Crag Eliminate A’ after hearing about how good the route is. So here are some route-specific lessons learned
- If approaching from the Walna Scar Road, when you reach the crest of the hill turn left at the path crossroads and continue climbing to reach the top of the crag, don’t go straight over. Give yourself a good 90 minutes to get to the base of the climb from the car.
- The scramble to the first belay was a bit dicey for us, so be careful
- Belay up after pitch one to the left underneath the mantleshelf start of pitch 2, rather than under the big flake
- If you have enough gear left then climb pitch 2 all the way to the sloping ledge under the roof, pitching this up probably cost us about 30-40 minutes with all my faffing building a belay
- Take a C6 or some big balls for pitch 4
- On pitch 5 after the crux, don’t stop at the first small ledge, continue up for a few more meters. The traverse left from the first small ledge isn’t the traverse of pitch 6 described by the guide (at least this is my best theory on where we went wrong).


